
Damp Proofing for 1950s House: A 2026 Guide
Table of Contents
Why 1950s Houses Are Prone to Damp
Construction Methods That Trap Moisture
Common Damp Problems in Post-War Homes
Signs of Rising Damp in Houses: What to Look For
Tide Marks, Salts, and Musty Smells
How to Tell Rising Damp From Penetrating Damp and Condensation
Damp Proof Course (DPC) Explained for 1950s Properties
When DPCs Were Introduced and Why Yours May Be Failing
Bridging Render, Pebble Dash, and Concrete Slabs
Improving Ventilation in 1950s Homes
Air Bricks, Sub-Floor Ventilation, and Cavity Walls
Condensation Control and Modern Ventilation Options
Rising Damp Treatment Cost: What Affects the Price
What Actually Drives the Price
DIY vs. Professional Damp Proofing: Where to Draw the Line
Getting an Accurate Damp Survey and Quote
Energy Efficiency vs. Damp Proofing: Getting the Balance Right
Why 1950s Homes Are Uniquely Exposed to This Conflict
Where Retrofits Commonly Go Wrong
The Correct Sequence
The Payback Trade-Off
Long-Term Maintenance Schedule for 1950s Homes
Conclusion
Frequently Asked Questions
Last Updated: September 30, 2026
Why 1950s Houses Are Prone to Damp
Damp proofing for a 1950s house starts with understanding one uncomfortable truth: these homes were built during a period of experimentation, material shortages, and rapidly changing construction standards.
Construction Methods That Trap Moisture
Post-war builders often used poured concrete slabs, shallow foundations, and solid brick walls with minimal cavity depth. Many of these methods inadvertently created pathways for ground moisture to travel upward through masonry. The absence of effective damp proof membranes in some builds compounds the problem.
Common Damp Problems in Post-War Homes
Owners typically report three issues: rising damp from failed or missing DPC, penetrating damp through deteriorated external render, and condensation from poor ventilation. Each requires a different diagnostic approach before any treatment begins.
Signs of Rising Damp in Houses: What to Look For
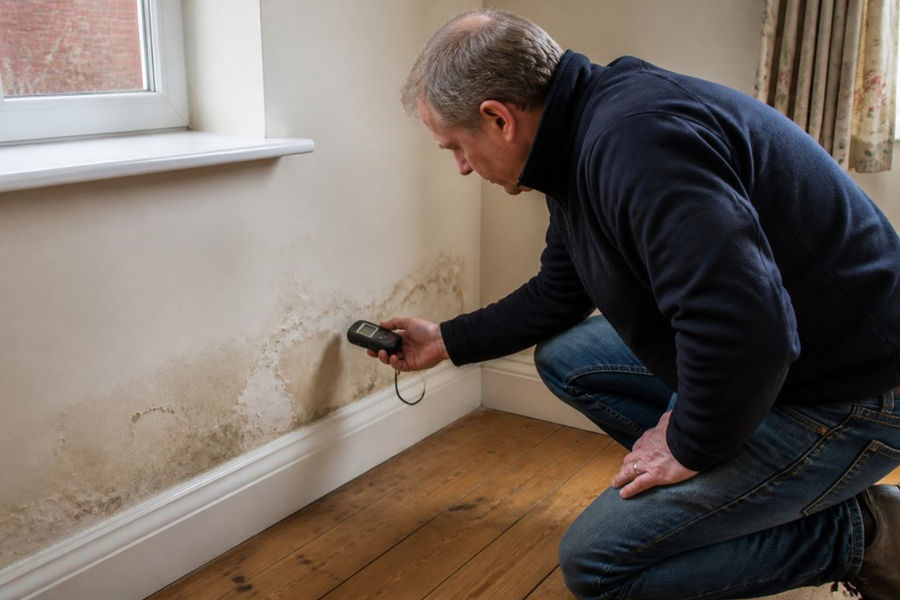
Signs of rising damp in houses follow a predictable pattern. A visible tide mark on interior walls, usually within the first metre above skirting level, is the clearest indicator. White powdery deposits, known as hygroscopic salts or efflorescence, often accompany it.
Tide Marks, Salts, and Musty Smells
Tide marks appear as irregular brown or yellow staining. Salts crystallise on plaster surfaces and contaminate the wall. A persistent musty smell suggests ongoing moisture ingress rather than a one-off leak.
How to Tell Rising Damp From Penetrating Damp and Condensation
Rising damp climbs from the base upward. Penetrating damp appears in patches on external-facing walls after rain. Condensation collects on cold surfaces and windows, often worse in kitchens and bathrooms. Getting this diagnosis right determines whether you need a new damp proof course, external repairs, or improved ventilation.
Damp Proof Course (DPC) Explained for 1950s Properties
A damp proof course is a horizontal barrier built into a wall to prevent ground moisture from rising through masonry by capillary action. Most 1950s properties have a DPC, but many have failed or been compromised over seven decades.
AMS SURVEYS
When DPCs Were Introduced and Why Yours May Be Failing
DPCs became mandatory in new builds from the late nineteenth century onward, so a 1950s home should have one. Failure typically comes from age, physical damage, or bridging. The UK government guidance on damp and mould in rented homes highlights how widespread these issues remain.
Bridging Render, Pebble Dash, and Concrete Slabs
Bridging occurs when external render, pebble dash, or a raised concrete slab covers the DPC and allows moisture to bypass it. This is one of the most common and easily missed causes of internal wall damp in post-war homes. A damp survey should always check external ground levels.
Improving Ventilation in 1950s Homes
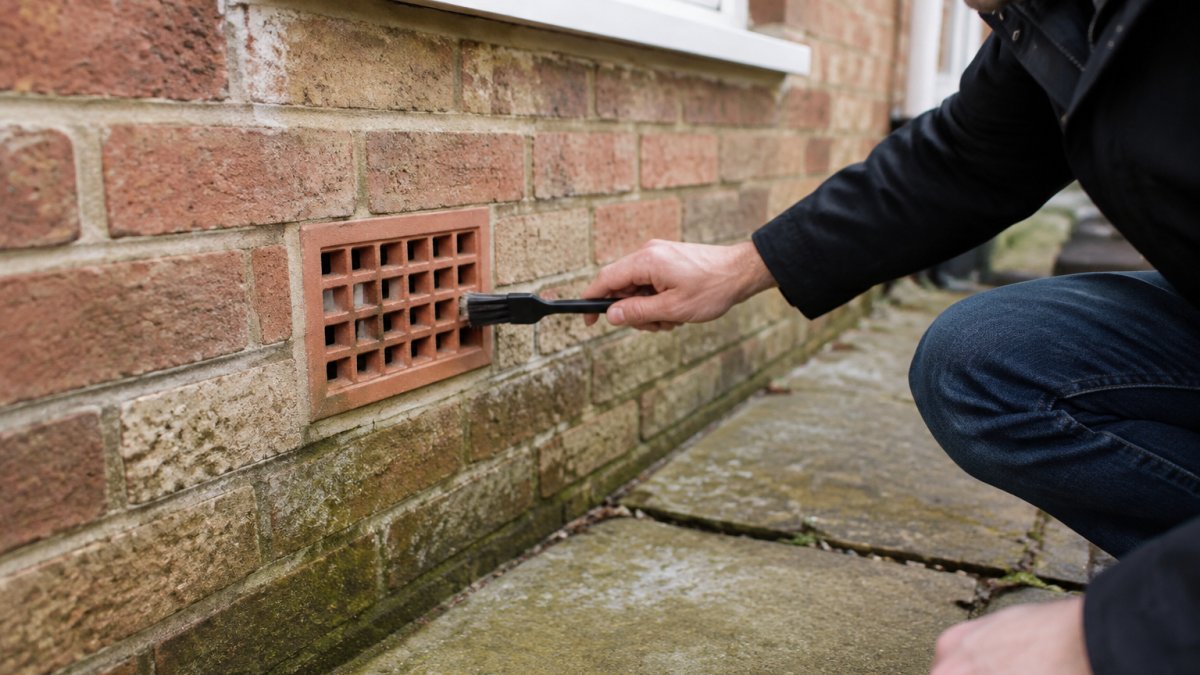
Improving ventilation in 1950s homes is often the missing piece. These properties were designed with air bricks and open chimneys to allow constant airflow. Modern draught-proofing, double glazing, and blocked air bricks have sealed that airflow in.
Air Bricks, Sub-Floor Ventilation, and Cavity Walls
Air bricks must remain clear. Sub-floor ventilation prevents timber decay in suspended floors. Cavity walls in this era are often too narrow for standard insulation, and thermal bridging at wall ties can cause cold spots where condensation forms.
Condensation Control and Modern Ventilation Options
Positive input ventilation, mechanical extract systems, and trickle vents offer controlled airflow without losing excessive heat. The NHS advice on damp and mould in the home explains why this matters for respiratory health, particularly in households with children.
Rising Damp Treatment Cost: What Affects the Price
Rising damp treatment cost is the question every homeowner asks first, and it is the one most surveyors dodge until they have seen the property. That is fair, but it is not helpful. What follows is a realistic breakdown of what drives the price in a 1950s home, so you can sanity-check any quote you receive.
What Actually Drives the Price
Chemical damp proof course injection is usually priced per linear metre of affected wall, not per room. The headline rate looks modest, but the total is built from several layers:
Wall length affected. A single bay of a 1950s semi might be 3-4 metres; a full gable end can be 8-10 metres. The difference is substantial.
Plaster removal and reinstatement. Injection alone is not the job. Contaminated plaster and render typically need to be removed to around 1.2 metres above the highest sign of damp, then re-rendered with a salt-resistant renovating plaster or a specialist damp-proof render system. This is often the largest single line on the quote.
Skirting, radiators, and fitted furniture. These must be removed and refitted, and any concealed pipework or wiring in the affected zone adds labour.
Access. Internal walls are straightforward. External walls behind a conservatory, a raised patio, or mature planting are not.
Number of injection holes and drill pattern. A standard injection is drilled at roughly 100-150 mm centres along the mortar bed. Dense or rubble-filled 1950s masonry can slow this considerably.
Making good and decoration. Replastering, skimming, and repainting are usually excluded from headline damp-proofing quotes. Budget for them separately.
Be sceptical of any quote that specifies injection only, with no mention of plaster removal, salt-resistant re-rendering, or skirting reinstatement. That is where the real cost sits, and where cheap quotes quietly grow.
DIY vs. Professional Damp Proofing: Where to Draw the Line
A clear decision framework helps here, because the DIY-versus-professional question is where most homeowners waste money in both directions.
Genuinely DIY-able:
Clearing blocked air bricks and sub-floor vents with a rod or vacuum.
Replacing broken air bricks with modern equivalent-sized vents.
Clearing gutters, downpipes, and hopper heads, and checking them during heavy rain.
Lowering external ground levels, gravel, or soil that sit above the DPC line.
Removing ivy, climbing plants, and soil bridges from external walls.
Fixing a dripping overflow or a leaking shower tray, both frequently misdiagnosed as rising damp.
Improving bathroom and kitchen extraction and using trickle vents correctly.
Professional work:
Chemical DPC injection, this requires correct hole spacing, injection pressure, and a suitable chemical, and it is not a job for a DIY cartridge gun.
Plaster removal and salt-resistant re-rendering.
Diagnosing whether the problem is rising damp, penetrating damp, or condensation. This is the step most homeowners get wrong, and misdiagnosis is the most expensive mistake in the whole process.
Any work involving structural timbers, floor joists, or a concrete slab that has bridged the DPC.
Getting an Accurate Damp Survey and Quote
A proper damp survey for a 1950s property should include:
Moisture readings taken at multiple heights and depths, not just a surface meter pressed against the wall.
A check of external ground levels against the DPC.
Inspection of the DPC itself where it is visible, and of any render or pebbledash that may be bridging it.
A check of gutters, downpipes, and roof-line defects.
A condensation assessment, including ventilation provision and occupancy patterns.
A written diagnosis that names the type of damp, not just "damp."
Get at least two written surveys with itemised quotes. The cheapest quote is rarely the cheapest job once plaster reinstatement and redecoration are added back in.
Energy Efficiency vs. Damp Proofing: Getting the Balance Right
This is the section almost no damp-proofing guide covers, and it is the one most likely to cost a 1950s homeowner money. The push to insulate and draught-proof these properties is real, and so is the risk that doing it badly traps moisture inside the building fabric and creates damp problems where none existed before.
Why 1950s Homes Are Uniquely Exposed to This Conflict
A 1950s house was designed to be leaky. Air bricks at low level, open chimneys, unsealed floorboards, and narrow or partially filled cavities all allowed a constant, gentle movement of air through the structure. That airflow carried moisture out as fast as daily life produced it, cooking, bathing, drying laundry, breathing.
Where Retrofits Commonly Go Wrong
External wall insulation (EWI) on solid or narrow-cavity walls. EWI can be an excellent upgrade, but if the wall is already damp from a failed DPC or bridged render, encapsulating it traps that moisture. Damp should be diagnosed and treated before EWI is specified, not after.
Cavity wall insulation in narrow 1950s cavities. Many 1950s cavities are around 50 mm, sometimes less, and are not always suitable for standard blown insulation. Poorly installed or inappropriate cavity fill can bridge the cavity and transfer moisture across to the inner leaf.
Sealing air bricks. Air bricks are not draughts to be eliminated. They ventilate the sub-floor void and, in some constructions, the cavity. Blocking them to save heat is a common cause of timber decay in suspended ground floors.
Double glazing without trickle vents. Replacing draughty windows with sealed units removes a major air path. Without background ventilation, humidity rises.
Loft insulation pushed into the eaves. This can block the ventilation path at the roof edge and lead to condensation on the underside of the roof covering.
The Correct Sequence
For a 1950s home, the order of operations matters more than the individual measures:
Diagnose and treat damp first. Rising damp, penetrating damp, and defective rainwater goods should be resolved before any insulation retrofit.
Establish controlled ventilation. Mechanical extract in kitchens and bathrooms, and a whole-house or positive input ventilation strategy where needed, replaces the uncontrolled airflow you are removing.
Insulate. Only then specify cavity fill, EWI, or internal wall insulation, with a specification that accounts for the wall's moisture behaviour.
Draught-proof selectively. Seal windows and doors, but leave air bricks and sub-floor vents alone.
If you are planning EWI, cavity fill, or a full window replacement on a 1950s property, commission a damp survey first. It is far cheaper to treat damp before it is sealed behind insulation than to remove the insulation to reach it afterwards.
The Payback Trade-Off
Insulation that traps moisture does not just cause damp, it undermines its own performance. Wet insulation conducts heat far more readily than dry insulation, so a damp wall can lose much of the benefit of the retrofit while also creating a health risk from mould.
Problem | Likely Fix | Typical Priority |
Tide mark on internal wall | Chemical DPC injection | High |
Bridging render | Lower external ground level | High |
Blocked air bricks | Clear or replace vents | Medium |
Cold spots on walls | Address thermal bridging | Medium |
Stuffy air, condensation | Add ventilation system | Medium |
Damp wall before EWI or cavity fill | Treat damp, then insulate | High |
Long-Term Maintenance Schedule for 1950s Homes
Maintenance prevents most damp problems. Check gutters and downpipes every autumn. Clear air bricks annually. Inspect external render for cracks each spring. Re-check internal walls after heavy rain. Keep a simple log so patterns emerge before damage sets in.
Conclusion
Damp in a 1950s home is rarely a single problem, and it rarely has a single fix. The right sequence is diagnosis, then treatment, then ventilation, then maintenance.
Frequently Asked Questions
Can you put a damp proof course in an old house?
Yes. A damp proof course can be installed in older properties, including 1950s houses. The most common method is chemical injection, where a damp proofing cream is injected into the masonry at regular intervals to create a barrier against ground moisture. This is less disruptive than older methods and typically takes a day or two for an average-sized wall. A damp survey should always come first to confirm rising damp is the actual problem and that a DPC is the right solution.
How much does it cost to have an old house damp proofed?
Rising damp treatment cost depends on the size of the affected area, the number of walls involved, and whether plaster needs replacing. Chemical injection is usually priced per metre of wall treated. Additional work such as removing contaminated plaster, applying salt-neutralising render, and redecorating adds to the total. Because every property is different, the only reliable figure comes from a professional damp survey and a written quote. You can book a call with Dri-House to discuss your needs and get a clear price before committing.
Is it illegal to sell a house with rising damp?
No, it is not illegal to sell a property with rising damp. However, you are legally required to disclose any known defects when completing a property information form. If a buyer's survey uncovers damp that was not disclosed, it can delay the sale or reduce the offer. Addressing damp proofing for a 1950s house before listing often makes the sale smoother and protects your asking price. A professional damp survey provides documented evidence of any treatment carried out.
When did houses start having a damp course?
Damp proof courses became a standard building requirement in the late 19th century, though early versions used materials like slate or bitumen that deteriorate over time. By the 1950s, most new homes included a physical DPC, often made from bitumen felt or similar materials. These have a limited lifespan and can fail after 30 to 50 years. That is why many 1950s properties now need remedial treatment even though they were built with a DPC.
Why is my 1950s house prone to condensation?
1950s houses often have poor ventilation, single-glazed windows, and solid or uninsulated walls. When warm, moist air from cooking, washing, and breathing meets cold surfaces, condensation forms. Many of these homes also had open fireplaces that provided natural draught; once blocked, moisture has nowhere to escape. Improving ventilation in 1950s homes through trickle vents, extractor fans, or positive input ventilation can reduce condensation significantly and lower the risk of mould growth.
What are the signs of rising damp in 1950s brickwork?
Look for tide marks on interior walls up to about one metre high, white salty deposits called efflorescence, peeling wallpaper, and a musty smell. Externally, check for bridging render or pebble dash that crosses the DPC line, and look for damaged air bricks. A moisture meter reading above expected levels near the base of the wall supports a rising damp diagnosis. Because these signs overlap with penetrating damp and condensation, a professional damp survey is the surest way to confirm the cause.
Do I need damp proofing, ventilation, or both?
Many 1950s homes need both. Rising damp requires a DPC and possibly plaster replacement, while condensation and poor indoor air quality need better ventilation. Treating one without the other often leads to recurring problems. A thorough damp survey will identify which issues are present and recommend a combined approach. Dri-House handles damp treatment, ventilation, and window upgrades under one company, so you get a coordinated plan rather than piecemeal fixes.
How long does damp proofing work last?
A professionally installed chemical damp proof course often comes with a guarantee, the duration of which depends on the provider and the treatment used. The actual lifespan depends on the property's maintenance, drainage, and whether bridging issues are corrected. Keeping air bricks clear, maintaining external render, and managing internal ventilation all extend the life of the DPC. Regular checks every few years help catch minor issues before they become major problems.
Book Free Call


Comments